moving

Welcome to The AIAIASP...........write to us on circlesecretary@gmail.com
Showing posts with label CSI. Show all posts

Working Procedures for CSI

S.No.
Document Name
URL
1.
Advance Customer Settlement
2.
Cash Transfer between CSI and Non CSI
3.
COD Epayment Steps Document
4.
COD After CSI
5.
Create Customer CRM
6.
CSI Bank Reconciliation
7.
CSI IPVS Schedule Creation
8.
CSI E-Payment V6.1(Non-COD)
9.
Customer and Contract Creation
10.
GSTN Configuration CRM
11.
Master Guide for BNPL Centres
12.
NAF Customers
13.
Reversing the Clearing Document
14.
Substitute Workflow
15.
CQ Request Process
16.
Cash transfer Process


Source : http://utilities.cept.gov.in/csi/

Simple Steps to Transfer an Official from one office to another in CSI

SIMPLE STEPS TO TRANSFER AN OFFICIAL FROM ONE OFFICE TO OTHER IN CSI
1)FIRST NOTE THE POST ID OF RELATED FACILITY ID to be transferred  BY USING TCODE 
ZHR_ERDETAILS-->TYPE PO ID-->PRESS F8
2)NEXT USING T CODE 
PA30 
  • GIVE EMPLOYEE ID AND TYPE 000 IN "INFOTYPE" FILED AND CLICK ON COPY ICON NOW GIVE START
  • DATE AS JOINING DATE , THEN SELECT TRANSFER TYPE AS "RT" OR others(by default)then change the position (postid noted using zhr_erdetails) now do three times ctrl+s and then click on yes two times "created on" and "delimited on" screen appears
3)NOW USING TCODE PO13 , SELECT ACCOUNT ASST. FEATURES SELECT ALL AND CLICK ON CREATE AND GIVE THE DETAILS(COMPANYCODE,BUSINESS AREA, PERSONNEL AREA,PERS.AREA) AND SAVE
4)NOW USING TCOE 9013 SELECT EMP GROUP/SUB GROUP , NOW CLICK ON CREATE GIVE EE GROUP AS "C" AND EE SUBGROUP AS 40(PA) AND SAVE
5) NOW USING PO13 SELECT RELATIONSHIP AND CLICK ON CREATE NOW SELECT "COST CENTER ASSIGNMENT" 
IN RELATION TYPE, SELECT COST CENTER IN TYPE OF RELATED OBJECT , THEN TYPE COST CENTER OF THAT OFFICE AND PRESS ENTER AND SAVE(CTRL+S) TWO TIME AND CLICK ON YES
6)Now do post to post mapping using PO13 if any changes in DDO, OR CL,RH granting authority or upload in excel through t code zhr_dct_updation
7)Now pls check roles assigned in IM PORTAL and assign the roles which you need
8) pls change cash requests and excess cash using zfwf tcode if it is delivery office with BOs

CSI PO Operation Guide in Hindi


View / Download

Thanks to 
Shri, Devendra Sharma
Supervisor, WTC
Jaipur-302001

How to Change CSI Password for All Application

  • Logout from all CSI applications ( Offline and Online)
  • Go to
  • Login with current CSI user ID and password
  • Click on Change SSO Password
  • Under Set New Password
  • Type new password (Password Complexity should be maintained)
  • And Confirm password both must be same
  • Than click on Submit
  • Login in SAP after 10-15 minutes
For POS Application
  • Run Daily Sync 
  • Run High Sync Repeatedly (certain interval)
  • Than try to login in POS BO and POS Counter with new password after 30- 45 minutes.
  • Don't try more than once if password is not permit to login. In this case you should execute Run High in regular interval to receive the password from central server.
For precautions
  • Don't wait until password getting expiry. The password should be changed 2days before expiry.
  • The change of password should be done at the end of the day.
  • The POS Server should in UP atleast 30 after changing the password and the execution of Sync should be done in regular interval.

Generate City Name from Pincode for Bulk Upload - CSI

Generate City Name from Pincode for Bulk Upload - CSI

While uploading "Domestic Bulk mail/Prepaid mail/bulk M.O." Excel templates in CSI POS, "City PIN not matched" error is often thrown for many articles, if name of the City does not exactly match with Pincode of articles.

To manage the issue, this Excel sheet has been prepared in which if PIN CODES are pasted (To be copied from Excel template), City names and P.O. names will be populated automatically. 

Just copy the data populated in those two columns and paste them in CITY , ADDRESS columns of Excel templates.
Because of this, hereafter no need to type City names and P.O. names in Excel templates for large volume of bulk articles going to be uploaded in CSI Point of sale. 

Note: 

However, other mandatory fields like Name, PIN, weight, Sl. No. etc., are to be entered in Excel templates carefully as usual. 

Always use the .xls template format available in POS for uploading data. Please do not save the Excel template file as .xlsx file type. 

Please ensure that only the valid data rows are maintained in the file and remaining unnecessary rows are deleted.

Click below link to download

Step by Step Guide to Create Vendor Master Data in SAP

Step by Step Guide to Create Vendor Master Data in SAP


In this tutorial, we will learn,

  • How to create a Vendor
  • How to Display Changes in Vendor Master
  • How to create a Vendor

This tutorial takes you through the steps to create Vendor Master Data

Step 1) Enter Transaction code FK01 in SAP Command Field
Step 2) In the Initial Screen, Enter
Select Account Group

  • Enter the Company code in which you want to create the vendor
  • Enter unique Vendor id according to number range in Account Group You can also leave the Vendor field blank. The system will assign a number when the data is saved

Optional - In the Reference section:

In the Vendor field, you can enter a reference Vendor if the details are similar to the new Vendor.

  • In the Company Code field, you can enter the reference Vendor's company code.
  • In this tutorial we will create a vendor without a reference. Click the Enter button.
  • Press Enter


Step 3) In the next screen, In Address Tab Enter the Following

  • Enter the name of the Vendor
  • Enter Search Term ,for searching the Vendor Id
  • Enter Street/House Number
  • Enter Postal code/City
  • Enter Country/Region
Step 4) Next in the Account Control section page Enter the Corporate Group if the Vendor belongs to a corporate group enter the group key
Step 5) Next in the Account Management Section

  • Enter the Reconciliation Account
  • Enter the Cash Management Group

Step 6) Next in Payment Accounting Section , Enter the Payment Terms

Step 7) Choose Save from the Standard Toolbar

Check the Status bar for Confirmation of successful creation of Vendor Master.


  • Change an existing vendor account - transaction FK02
  • Display a vendor account - transaction FK03
  • How to Display Changes in Vendor Master
  • Enter the Transaction Code FK04 in the SAP Command Field

  • In the next screen, Enter the Following
  • Enter the Vendor Account Number
  • Enter the Company Code

  • In the next screen , Select the Field from the list of Changed Fields

  • In the next screen, List is generated with New Value and Old Value of the field

Role Assigning and Configuring above/below role by RDA in CSI - IM Portal

RDA - Role Delegation Authorities :
RDA should be enable for Two or three Group B Officer for assigning roles to the official working with in the division or unit. Once RDA enabled for requested user, we can assign role, enable user and reset password to the officials comes under the control of RDA user.


Process of Role delegation authorities sample role assignment is as under

Quick Tips for accounts verification at the end of the day - CSI

In CSI offices, accounting is centralized at transaction level. Hence there is no requirement of consolidation of accounts at sub office and head office level. Classification according to account codes is done automatically at the point of transaction, in respect of all POS and DPMS transactions. However, in respect of other financial transactions like Finacle, Mccamish, WUIMT, MMTS etc, there is a need to do voucher posting currently. Once integration is completed (which is expected to be done on completion of country-wide rollout of CSI), there would be no requirement of voucher posting.

The actions needed to ensure correct accounting in CSI offices are outlined below:
  • Tallying of system balance with physical balance:At the start of business day, view ZFBL3N and check the correctness of the ‘DOP Cash’Opening Balance with that of physical balance. At the end of business day, the closing cash balance of ZFBL3N should be tallied with that of Physical balance. Any difference can be due to the missing voucher postings of financial transactions like PLI/RPLI, WMTS, MMTS, etc. Any pendency in voucher postings of Finacle transactions does not affect the DOP cash unless, they are wrongly posted in reference to DOP Cash.
  • Accounting of transactions: All POS transactions have to be accounted through ‘POS Back Office Cash’ as obtained from Treasurer/DOP cash. Voucher posting relating to Finacle transactions (DPBS) done through POS has also to be with reference to ‘POS Back Office Cash’only. DOP cash GL is not to be used for this purpose. If DOP Cash GL is used, it will inflate the cash balance of treasurer and resultantly the closing DOP cash balance and physical cash balance will differ.
  • Allocation of cash to counters: The allocation of cash to POS counter must be invariably done through POS Back Office module.In no case, cash which was not routed through the process be used in the POS counter.
  • Verification of closing cash: Ensure correctness of Closing cash (DOP Cash) as in ZFR_DAY report of previous day with the opening DOP cash as in ZFBL3N report. Differences can be verified with the subtotals of each G/L by the FAGLL03 report with respective Posting Key of the day with that of ZFR_DAY_NEW.If the cash transfer is done through voucher posting, those figures will not reflect in ZFR_DAY_NEW, resulting in difference with ZFBL3N balance.
  • Use of appropriate posting key: While posting any transactions in SAP, use appropriate posting key for Debit or Credit. In general, when department receives cash, DOP cash / POS cash GL as the case is debited (use Posting Key 40) and respective receipt GL is credited (use Posting Key 50). When department pays cash, DOP cash / POS cash as the case credited (Use Posting Key 50) and payment account head is debited (Use Posting Key 40).
  • Posting of PLI/ RPLI transactions: The transactions relating to PLI/RPLI done through POS, need to be posted at the end of the day by using DOP cash GL as debit or credit as the case may be [till issuesin POS/McCamish are settled]. Voucher postings of Finacle transactions and McCamish should be done with reference to the swift report figures generated from POS module.
  • Cash transfer to other offices: Cash transfer to other offices should invariably be done through workflow only and not by voucher postings. Cash received through workflow should be acknowledged by the receiver office on receipt of Cash,failing which DOP Cash of the receiver office will not be debited, i.e, balance will not be raised. Instances were noticed where cash receipt was posted manually and resultantly Cash in transit of the sender office is outstanding.Any lapse in these procedures will lead to different closing balances in ZFR_DAY and ZFBL3N.
  • Functioning of DPMS: Every event of malfunctioning in DPMS is to be brought to the notice of TCS by raising tickets appropriately. When DPMS is down, voucher posting has to be done in respect of disbursements of Money orders, undelivered MO, receipts of COD and VPP. APM (Mails)/SPM should ensure that the MO postman issue is settled on a day to day basis. This can be verified through FAGLL03 with GL code 4200020009 of the respective profit centers. Please ensure that sum of MO postman issue is also zero at the end of the day.
  • Checking for pendency: The sum of POS CASH GL 4867100011 should be zero at the end of the day. Any outstanding balances indicate pendency of voucher posting of Finacle transactions held in POS that day. The pending balances can be identified from the swift report from POS. Voucher postings for Finacle transactions should be invariably done with reference to POS CASH GL only. Rarely, there can be cases where invoices raised for walk- in customers in POS but billing not occurred in SAP, resulting in outstanding POS balances. This can be verified through FAGLL03, where invoice and billing documents can be linked with the code available in the text column.
  • VPMO booking: While booking the VPMO and crediting VP clearing accounts, the appropriate check box for VPP should be clicked to enable proper accounting and clearance of their respective documents. The proper procedure for clearing COD receipts and its remittances to the sender may be followed through CSI only.
  • Third party transactions: Third party transactions like WUIMT etc, which are not integrated with and not functioning in CSI POS, be done with DOP cash and voucher posting be done with reference to the Hand to Hand book of receipts and payments as tallied by the respective PA.
  • Verification of Voucher posting: Once the Voucher posting is completed for the day, it may be cross-verified with the shift report figures as generated in POS for that particular day. Any variation be reconciled immediately and posted.
  • Remittances: While making cash remittances between HO and SO, the prescribed workflow should invariably be followed. In case of Remittances from SO to BO and BO to SO, when Workflow is not functioning, direct posting with single DOP GL be avoided. In such cases also SAP GL of cash in transit should be used.
  • Certification of voucher posting: The entire voucher posting be supported by a voucher, which should be signed and approved by the PM/ SPM. In case of voucher posting relating to Finacle and PLI/RPLI, the signed copy of Excel sheet be used as voucher and Document number be mentioned therein.
  • Traceability of payments/ receipts: Every payment /receipts should invariably support by voucher/List and the Document number in which it is posted be mentioned in the Voucher.
  • Cheque clearance: The Clearance of Inward and outward cheques received for various transactions are processed through FSI and the GL of POR Chennai be used for the cheques got realized through Chennai Grid. Separate procedure issued by PAO Bangalore be invariably followed.
  • Accounting of BO transactions: As all the BOs are under Non CSI as BOs are not computerized, the transactions posting thereon be checked by taking ZFR_Day report for the Branch Office and its data be checked with the Hard copy of respective BO daily Account. No activity be kept backlog and the day’s work be completed and tallied on the day itself.
  • Verification of one-time customer GL: For any Transactions in POS, an invoice is generated with one time customer GL for walk in customer and it should be ensured that it will be zero at the end of the day. Cross check with reference to FAGLL03. Any variations should be reported with raising tickets.
  • Use of correct document type: While doing voucher posting, correct document type of CSI be used.
  • Posting of Bank Scrolls: The Drawings from Bank clearing account and remittance to bank Clearing GLs should be cleared on posting of entries on receipt of Bank Scrolls.
  • Care in selecting proper field in POS transaction: Proper care may be taken while feeding appropriate fields while making POS transactions, especially while scanning bar codes. There have been instances of barcode being fetched in Amount field wrongly. Even after reversal entry, the account shows distorted figures. Hence avoid such instances.
  • Records: Every office must take a print of the day’s account which is to be signed by Head of the office. All vouchers/lists etc be sent to HPO duly noted with document number. HPO will send such vouchers and lists along with its records to PAO Bangalore.
  • General Check at HPO: The HPO shall check the SO/BO accounts by accessing the data online. No need for taking print outs for rendering accounts to HPO by SPOs. The Postmaster concerned shall have to nominate such employees and role be authorized. It is the duty of the Postmaster to ensure check on day to day basis and raise such objections deemed fit and also raise tickets with TCS. The Divisional Head may obtain revised MDW consequent on CSI Roll out and examine and approve accordingly 

How to apply leave in CSI Post Office?

How to apply leave in CSI Post Office?

Leave is essential to all postal department employees in their career. The CCS conduct rule says “LEAVE IS NOT A RIGHT IT’S A PRIVILEGE”. So our department employees take fewer leaves compared to other departments.

After introducing CSI, employees can apply any kind of leave through the system itself. This technology helps us save paper - “SAVE PAPER SAVE TREES”.
Let’s see how to apply for leave on a CSI system?
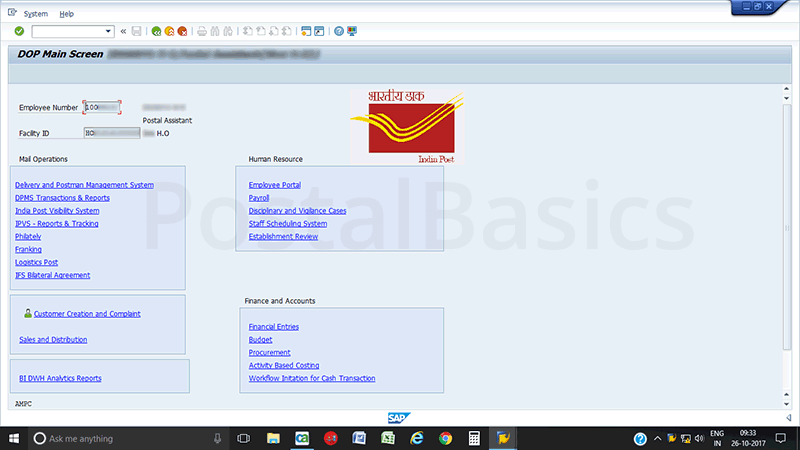
In SAP, go to DOP Main Screen or type the T-code zdop_main. The below window will be shown up.


Click on Employee Portal. It will redirect to next page as shown below.


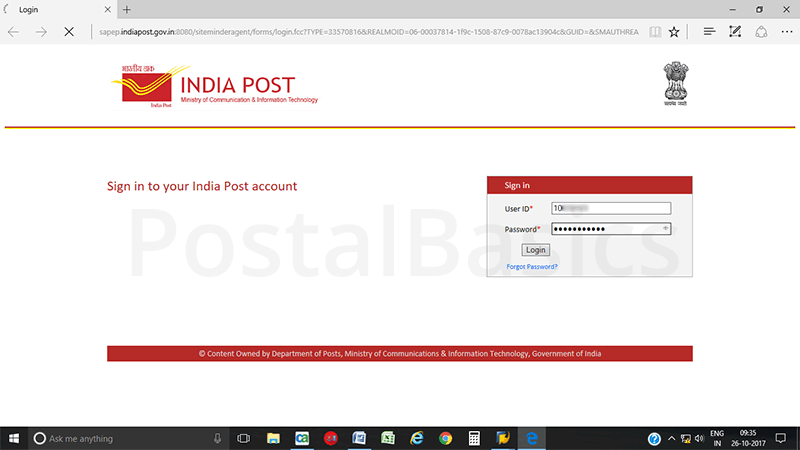
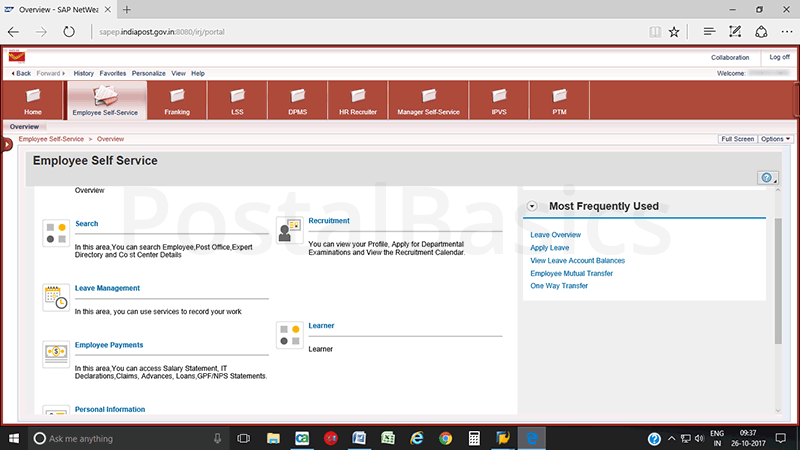
Enter the User ID and Password. Click on Log-on to enter into the page. It has some of the icons at the top of the window like Employee Self Service, Franking, LSS etc. Refer to the screenshot below.


Click on the Employee Self Service icon. You will get some options like,

Search

Leave management – For Leaves.

Employee Payment – For loans, Salary Statements etc.

Recruitment – Departmental calendar, Vacancy etc

Personal information – Nominee details, Mutual Transfer, HR query, Asset declaration, My Service book etc.

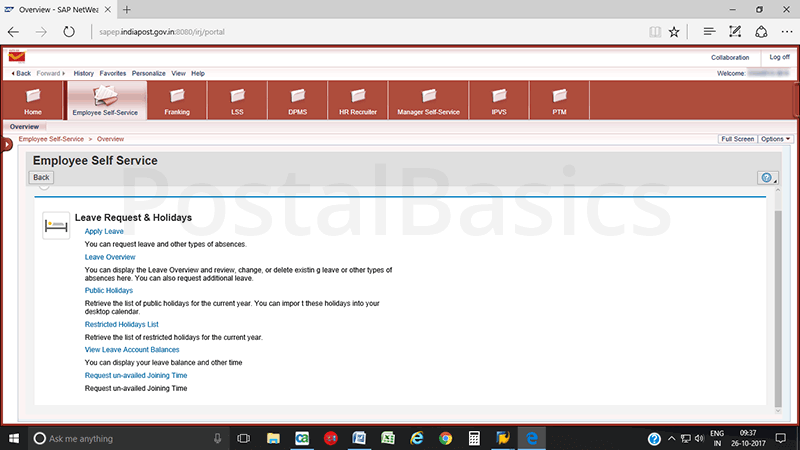
Here click on Leave Management. You will see the below screen.


Here, you have the list like, Apply for leave, leave overview, Public Holidays and Restricted Holidays etc.

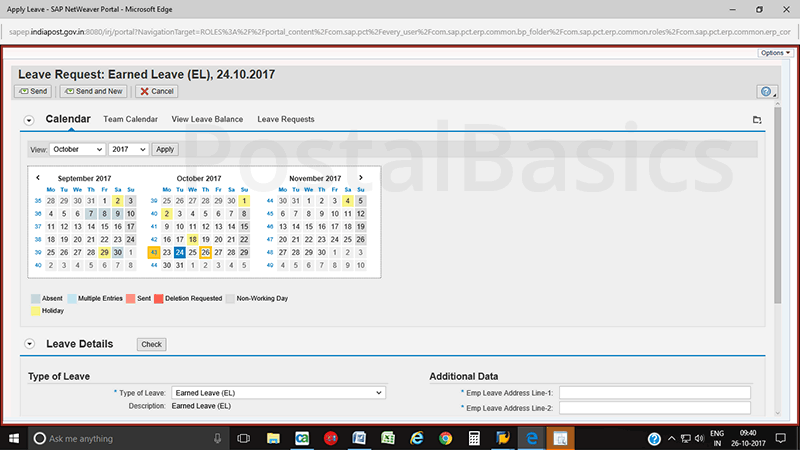
Go to Apply Leave. The below window will show up.


In this page, you have options like, Calendar, Team Calendar, View Leave, Leave Request.

In calendar - all holidays, non-working days, absent days can be identified in different colors.

In Team calendar - shows the same details but it includes all staffs details of an office.

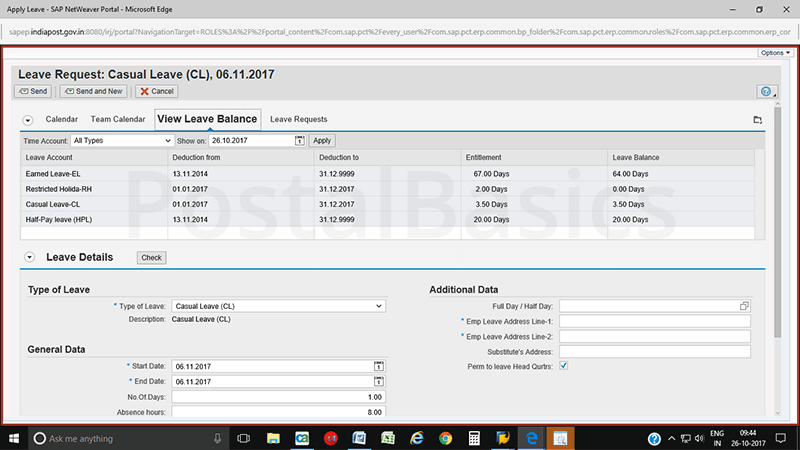
In Leave balance - you can see the balance of all kind of leaves until today.

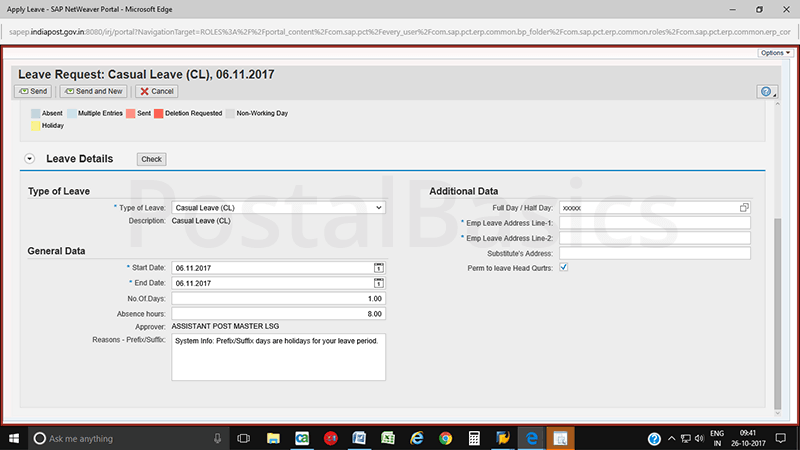
I’m going to take one example of Casual leave on 6.11.2017.


Type the following details.
Type of leave Casual
Start date From date
End date To date
No. of days 1 or more
Reason Enter the reason for leave.
Address Personal address.(For Half pay leave you have the provision to attach medical certificate.)


If you want to take the permission to leave the Head Quarters then click on the checkbox.

Once you enter all the details, click on Send button.


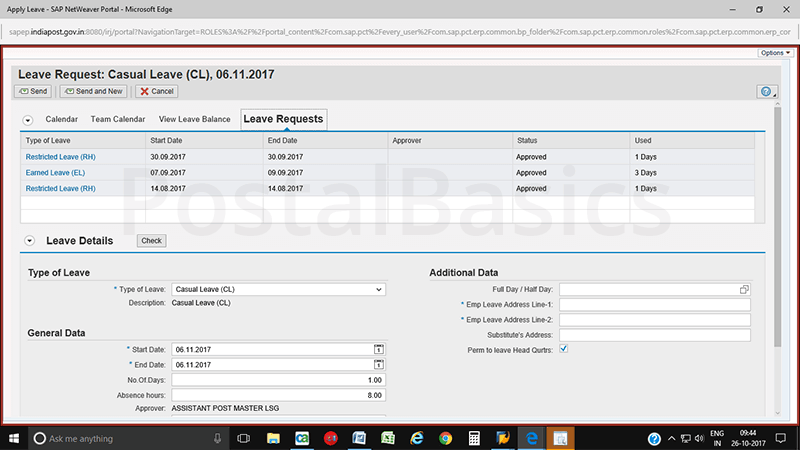
If it is CL/RH, a message will go to PM/SPM of the same office for approval or else it will go to Divisional Office for approval.

You can check whether the applied leave gets approved or rejected by clicking Leave Request as shown below.


You can also check the balance by clicking View Leave Balance menu as shown below.


This is how you can apply leave in CSI.

Some questions with their solution related to CSI


Lite Version of CSI Utility

Lite Version of CSI Utility
Download from below link
Features of Lite Version of CSI Utility :-
1) It is a standalone application. No worry about server and client concept.
2) Easy to install and confgure.
3) No User login required.
4) Just type GL Code or Head Name to select a proper head name. (Reduces searching time)
5) No maintanance of Opening and closing balance.
6) No saving of fed data. Just feed the data and export to text file.
7) Easy to add or modify GL Codes and profit centers.
8) DO Not required any big Database Software like SQL Server, Oracle, etc.
9) It is an emergency application if CSI Utility Plus version is not working properly.
10) Summary view to tally category and office wise totals.
11) Report for generated text file for reference in the future.
12) This version best suitable for C class and B class offices (And also bigger offices).
13) You can use Lite and Plus Versions both simultaneously in the same system.
If any clarification please mail to csiutilitycare@gmail.com
With Best Regards,
Srikanta S

CSI Utility 2.7 Setup dated 15-04-2017 for Voucher Posting in CSI

Core System Integrator Utility Tool v2.7 Download


All are requested to download the CSI utility to handle the voucher postings easily. The following transactions needs to complete only by voucher posing method.
1. Bills Paid
2. Finacle Consolidation Entries (like SB Cash- only Transactions entries like SB Dep, Withdrawal, RD, TD etc.,)
3. McCamish Tranctions
4. BO Transactions
5. Bills Paid
6. Cheque.
Click below link to download CSI Utility.


This is a Tool used to post vouchers which are all posting the entries using F-02 Voucher Posting in CSI. This is a user friendly software.
In CSI, two types of voucher postings are available. One is F-02 and another one is file upload method.

"F-02"  For Single Entry of Document

"ZBF07" To Upload Text file of Voucher Posting
In First Method, it takes more time to complete a transaction and not user friendly also. But in second method we can generate the text file using the CSI Utility tool and we can upload number of transactions with in few minutes. 

Thanks to the Developer of CSI Utility Tool.

CSI Important information

CSI Important information and Materials


To view CSI complete study materials, please CLICK HERE.

To view CSI Operating Manual, please CLICK HERE.

Applying Leaves in CSI Platform


Click below link to Download Procedure to apply leave in CSI

How to trace the customer details in DOP Finacle

  • In order to trace the customer details in DOP finacle recently a new menu launched in finacle which is nothing but CICD
  • CICD stands for Customer Menu for Inquiring of Customer Details which is nothing it will display the details of the customer.
  • We can trace customer PAN number, Adhaar number, mobile number and whether enrolled in PMJJY/PMSBY schemes by using the menu CICD.
  • This is menu is very handy and useful menu for all the user working in DOP Finacle.
  • The operating procedure and step by step usage of this menu is illustrated below.

Procedure to trace the customer details in DOP Finacle :- 

  • Invoke the menu CICD menu then the system will display the below screen shot as shown below


  • From the above screen shot it is clear that system is asking only two fields account number and cif id of the customer. Hence enter the customer account number then the cif id field will be auto filled by the system as shown in the below screen shot.
  • After entering the above mentioned fields as shown in the screen shot then finally click on Go then the system will display the customer details.

Source: http://dopfinacle.blogspot.in/